✨ Introduction
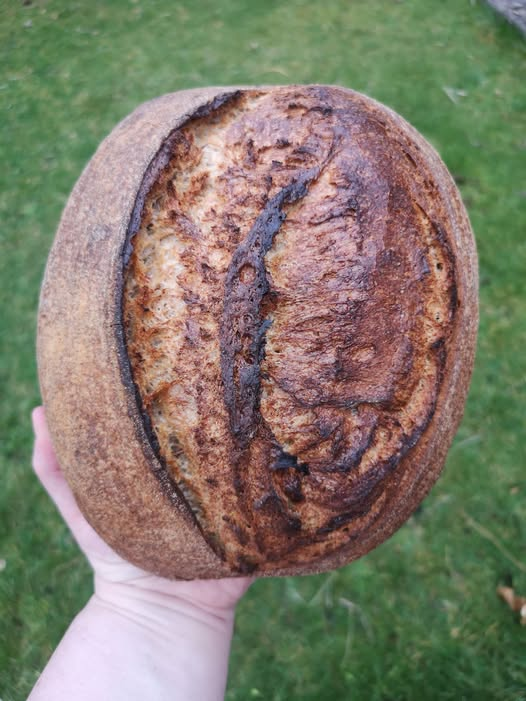
A good homemade loaf never goes out of style, and these Standard Loaves are exactly the kind of bread every kitchen needs. Crispy crust, soft chewy inside, and that rich homemade flavor make them perfect for everyday baking.
Whether you’re making toast in the morning, sandwiches for lunch, or serving warm bread with dinner, a classic artisan loaf always works beautifully.
The best thing about these Standard Loaves is their simplicity. No complicated ingredients, no fancy techniques — just flour, water, salt, starter, and patience creating something truly special.
The first time I baked a proper loaf with a crackly crust and airy crumb, I understood why sourdough baking becomes addictive so quickly.
💛 Why You Will Love This Recipe
These homemade Standard Loaves are loved because they are:
- Crispy outside and soft inside
- Naturally fermented for amazing flavor
- Great for beginners and experienced bakers
- Perfect for toast, sandwiches, or soups
- Rustic bakery-style bread at home
Fresh homemade bread simply tastes better.
🥣 Ingredients You Will Need
🍞 Main Ingredients:
- 500g bread flour
- 375g warm water
- 100g active sourdough starter
- 10g salt
Optional:
- Whole wheat flour for extra flavor
- Rice flour for dusting
👩🍳 Step-by-Step Instructions
🍞 Step 1: Mix the Dough
In a large bowl, combine warm water and sourdough starter.
Add flour and mix until no dry flour remains.
Cover and let rest for 30 minutes.
💡 This resting stage improves dough texture naturally.
🍞 Step 2: Add Salt
Sprinkle salt over dough and mix gently until combined.
The dough may feel sticky, which is completely normal.
🍞 Step 3: Stretch and Fold
Every 30 minutes, stretch one side of dough upward and fold inward.
Repeat 4 times over 2 hours.
This helps build strength and structure in your Standard Loaves.
🍞 Step 4: Bulk Fermentation
Cover dough and let rise until airy and puffy.
This usually takes 4–6 hours depending on room temperature.
🍞 Step 5: Shape the Loaf
Transfer dough onto lightly floured surface.
Shape gently into a round or oval loaf.
Avoid pressing out too much air.
🍞 Step 6: Final Proof
Place dough into floured proofing basket or bowl.
Cover and refrigerate overnight for better flavor.
This slow proof gives Standard Loaves their classic artisan taste.
🍞 Step 7: Bake
Preheat oven to 230°C (450°F) with Dutch oven inside.
Score the top of dough with a sharp blade.
Bake covered for 20 minutes, then uncovered for another 20–25 minutes until golden brown.
🍞 Step 8: Cool Completely
Let bread cool fully before slicing.
This helps maintain a soft crumb and crispy crust.
💡 Pro Tips & Variations
- Use bread flour for better chewiness
- Add whole wheat flour for rustic flavor
- Cold fermentation improves taste
- Steam helps create crispy crust
- Wet hands instead of adding too much flour
Mistake to avoid: rushing fermentation time.
🥗 Health Benefits of Homemade Sourdough
Homemade Standard Loaves can feel more wholesome than store-bought bread because:
- Natural fermentation may support digestion
- No preservatives or additives
- More filling and satisfying texture
- Homemade ingredients you fully control
Simple ingredients create incredible flavor naturally.
🍽️ Serving Suggestions
Fresh artisan loaves pair perfectly with:
- Butter and jam
- Soups and stews
- Cheese boards
- Olive oil and herbs
- Sandwiches and toast
Warm slices fresh from the oven are honestly unbeatable.
🧊 Storage Tips
To keep your Standard Loaves fresh:
- Store at room temperature for 2–3 days
- Wrap in cloth or bread bag
- Freeze slices up to 2 months
- Reheat in oven for fresh crust texture
💡 Avoid storing bread in the refrigerator because it dries out faster.
❓ Frequently Asked Questions
1. Why are my Standard Loaves dense?
Usually from underproofing or weak starter activity.
2. Can beginners make artisan sourdough bread?
Yes! Practice and patience matter more than perfection.
3. Why isn’t my crust crispy?
Steam during baking helps create crisp crust.
4. Can I bake without a Dutch oven?
Yes, but Dutch ovens trap steam better.
5. How do I know the loaf is done?
The bottom should sound hollow when tapped.
🌟 Conclusion
These homemade Standard Loaves are simple, rustic, and full of comforting artisan flavor. From the crispy crust to the soft chewy crumb, every slice feels fresh, wholesome, and satisfying.
Once you start baking your own bread, it’s hard to go back to store-bought loaves again.